My Open Source Photography Workflow
After several years of trial and error, I finally have a complete RAW photography workflow in Linux that I am happy with.
The applications in this workflow aren’t just native to Linux, they are also free, open source software (FOSS). There is no need to dual boot, use WINE or a virtual machine. It’s a pure FOSS photography workflow running in Linux.
1. Image Viewer
Geeqie

For an image viewer, I am just looking for something simple, fast and color managed.
I don’t need a photo manager, darktable already has that covered. The image viewer just needs to be able to open all major photo formats quickly, so I can review my exported images. Geeqie does all that wonderfully.
Since color management is a priority for me, popular applications like Shotwell and Eye of Gnome aren’t even a consideration.
Although Geeqie can display EXIF data, histograms and more, I usually remove all the sidebars and widgets so I just get a quick, clean look at my photos.
2: Monitor Calibration
dispcalGUI or Gnome Color Manager

Whether you’re a hobbyist or a professional, the first step in your photography workflow should be to calibrate your monitor’s color with a device called a colorimeter (or a spectrometer). This is necessary for the colors on your screen to be accurate. If they aren’t, you can’t properly correct color and exposure.
dispcalGUI has more advance features, such as measuring ambient light and a test chart editor, than Gnome Color Manager. If you are an enthusiast or professional, dispcalGUI is probably the best option for you.
If you are looking for something quick, and don’t want to be overwhelmed with options, Gnome Color Manager is excellent. It is also easily found in most popular Linux distribution’s repositories or already installed by default.
Hardware Compatibility
I have used several different monitor calibration instruments in Linux. Below is not a technical review, just a brief summary of my own personal experiences with them.
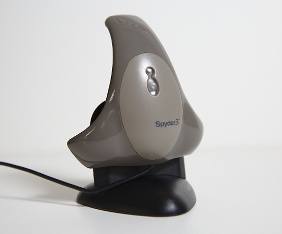
I prefer the color profiles created with the ColorMunki Display, but this older Spyder model is still great.
Unlike the ColorMunki Display, I’ve never had any compatibility issues. Just plug it in and go.
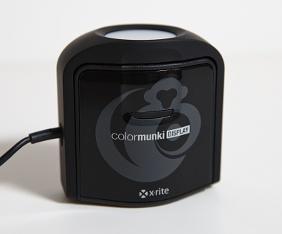
Of the three instruments, I think the ColorMunki Display generates the best profiles.
However, I’ve had problems with both Linux and Mac OS X recognizing the device at times. Due to its compatibility issues, I can’t recommend it.

The ColorHug is the only open hardware option that I know of.
Back in 2013, it created color profiles that were too red. However, this has improved greatly in the latest firmware update. Despite its issues, I am very happy to support the open hardware option.
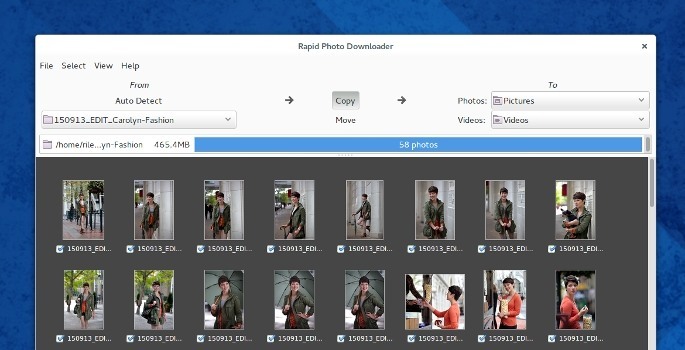
3. Download and Rename Photos
Rapid Photo Downloader
I keep all my photos and folders organized by using specific naming conventions that include the date and a description, ie:
YYMMDD_Summer-in-Brno-0001.CR2
YYMMDD_Summer-in-Brno-0002.CR2
YYMMDD_Summer-in-Brno-0003.CR2
YYMMDD_Summer-in-Brno-0004.CR2
Renaming my folders and photos makes finding them so much easier. Rapid Photo Downloader automates this process for me.
Depending on my needs and settings, I can often just insert my memory card, type in a description (job code) and click download. My folder, sub-folder and photos will automatically be renamed.
Rapid Photo Downloader can also create backups to a destination of your choice during the download.
darktable has an option to download and rename your photos as well. This may be enough for some users. I just prefer Rapid Photo Downloader for its automation and features.
4. Custom Camera Color Profiles
ArgyllCMS

I create custom color profiles for my camera to produce consistent, accurate colors and to speed up my workflow. I do this by taking pictures of a color target in different lighting conditions and using ArgyllCMS to generate an icc color profile. This is all done on the command line.
There a several color target options. I am using the ColorCheker Passport target, but enthusiastic FOSS users might prefer Wolf Faust’s color targets which are released under a Creative Commons license.
Unfortunately, this step is often frustrating. Unless the photo has been taken in a very specific way, Argyll will not properly recognize it. This can lead to many failed attempts even after you think you have mastered it.
There used to be a Linux version of CoCa, a GUI to make this camera color calibration process easier, but it appears to have been dropped. It would be great to see someone in the community picked it up.
5. Photo and Metadata Management
darktable
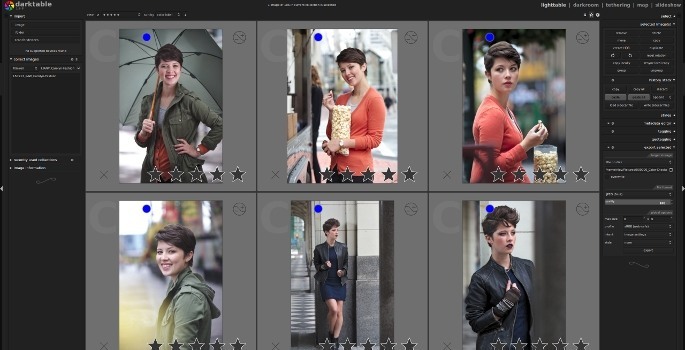
Before I begin editing my RAW photographs, I need to cull the images using ratings and add important metadata. The lighttable view in darktable allows me to do just that.
I can quickly review a collection of images, add a star rating of 1 – 5 and then filter the results to only show what I what. IPTC metadata such as keywords, description, copyright information and photographer credit can also be added here.
An important part of photo management is being able to quickly and easily retrieve images from a large collection. The lighttable view allows you to filter your images through many variables such as: rating, keywords (aka: tags), date, color label, iso, camera model, etc.
6. RAW Editor
darktable

There is a surprisingly high number of good RAW photo editors available to Linux users, including digikam, RAWtherapee and darktable. For me, darktable is the best option.
darktable covers all of the basics like white balance, exposure, curves, shadows and highlights. However, it goes beyond that allowing for advanced selective editing with drawn masks, precise control over adjustments (I am particularly fond of the “bauhaus sliders”) and blend modes.
I didn’t fall in love with darktable right away. It can be very intimidating to new users. There are a lot of different tools full of sliders, drop down menus, presets and options. Many of these modules (darktable’s name for the tools) have the same or similar functions as other modules.
However, if you can get passed its initial learning curve, you’ll discover a fully-featured, powerful application that can even meet the needs of many professional photographers. I love having such a great application to edit my RAW photos with under Linux.
7. Touch Ups and Web Preparation
GIMP

After years of editing photos in Adobe Photoshop, I was surprised to find out that I actually really like the Gnu Image Manipulation Program (GIMP).
However, I first had to change the user interface and keyboard shortcuts to mimic Photoshop’s before I felt at home. But after that, it was smooth sailing.
Often, my work in GIMP is limited to just some quick touch ups before I export images for the web. But even when I want to get more in depth, like skin smoothing or making composite images, the GIMP still gets the job done. Though I find that any serious work requires several extra plugins to be installed.
If your familiarity with Photoshop is making it hard for you to transition to the GIMP (it did for me), I wrote an article outlining the steps I took.
Learning More

If you are interested in learning how I use these programs, I created The Open Source Photography Course. The course contains over 5 hours of video tutorials that teach you a RAW photography workflow using only free, open source software (FOSS).
Free Options
If you are interested in free options, darktable’s website lists several resources including videos and an ebook. For GIMP users, there are so many resources available, I couldn’t list them all. You might want to start with a collection of tutorials, or head over to Pixls.us for some great articles and an active community.
Comments
You are welcome to post constructive comments that are respectful and polite to others. The comment section will be closed after two weeks.

")


15 Comments
sandy pittendrigh
October 26, 2015After downloading images I use geeqie, UFRAW and Gimp. I generally use UFRAW in stand alone mode and then use its embedded icon to spawn Gimp (for the currently selected image).
However, I do like the idea of (Darktable) scoring raw files on a 1–5 scale so they can be sorted according to quality.
I’m pretty sure I could configure geeqie to send images to DarkTable instead of UFRAW.
What are the trade offs? What other benefits (aside from scoring) does Darktable have over UFRW?
Rye
October 27, 2015That sounds like a very functional FOSS workflow. I am glad you found something that works for you.
I haven’t tried UFRaw in several years, so I may be wrong, but I think there are many features lacking compared to darktable. Batch editing, rating, sorting, tagging multiple images with keywords, and a larger selection of editing tools come to mind.
Is there batch editing in UFRaw? Being able to edit one image’s white balance, exposure, saturation, etc. and then copy those same edits to 100 other images is hard to live without.
Taras
October 24, 2015Thanks for interesting article!
Do you store RAW files after processing? If so for what purposes?
Rye
October 24, 2015Of course I keep the RAW files. You should too. They are your original lossless files. It’s important to keep the original files for future editing.
Taras
October 24, 2015It’s a good subject for discussion :) How often do you re-process old RAW files?
If talk about me. When I process RAW files (I also use Darktable) I give them rating with stars. After that I store only the best (as I think) ones. The end format which I use is JPEG without compression. Sometimes I think if I really need ever these RAW files of the best photos…
Haarek
October 22, 2015What a great insightful article, I really enjoyed reading it. I’ve even found some amazing tools that i’ve never heard of before! Hopefully people with other professions (architects, home- or webdesigners, game developers, teachers, etc.) will get inspired by this and do their own writeups! Perhaps we could have a one-stop site that lists suggested workflows based on profession, I think that is something that could be very beneficial for society.
Rye
October 22, 2015Thanks! I am happy to hear you enjoyed the article and learned something new.
CFWhitman
October 21, 2015That is very similar to the workflow that I use, though I was not familiar with Rapid Photo Downloader. I never adopted a proprietary workflow for my photography, so I didn’t have that to overcome. I used to use Bibble as my raw editor (and it is still available for Linux as Corel Aftershot Pro), but with the advent of Raw Therapee, and now Darktable (which has gradually become my go-to editor), I stopped updating my license for it. It is still a very nice program, of course, but is closed source.
Rye
October 21, 2015I also used Aftershot Pro for a while. It was actually pretty good. Unfortunately, I had a bad experience with the newer releases and it is closed source.
I think the open source options are great now.
kie
October 21, 2015Looks similar to my workflow but in addition I use kphotoalbum for organising my photos.
http://www.kitamura-studios.com/free_software_workflow.shtml
Rye
October 21, 2015Cool. I never heard of kphotoalbum.
Gianluca
October 20, 2015Hi Rye, I use Fedora to manage all my photos and tried to set my own workflow to edit RAW pictures under linux.
I have tried both RAWTherapee and Darkroom and really enjoyed the endless possibility these applications offer.
Unfortunately, I couldn’t find a way to handle the grain of the raw picture in the same way as the camera does internally when it generates the jpeg.
For a while I had my Nikon DSLR set to take both RAW and jpeg and the edited version of the 24Mpixel RAW presented more visible pixelled details than the jpeg.
I have also applied the demosaic tool with the correct camera/ISO profile but the result wasn’t that good.
Do you have any advise on this? Am I missing something trivial?
Thanks for the article anyway… I can’t wait to try the tools mentioned in it!
Rye
October 20, 2015Hi,
Have you tried multiple instances of the “denoise (profile)” module, one for luma and one for chroma noise? I find this to be the best way of removing noise while retaining detail.
It is described in the second bullet point under “Typical Use Cases” here: https://www.darktable.org/usermanual/ch03s02s04.html.php
orkomedix
October 20, 2015Thank you for this article! Great to see people excited about OSS for photography! Does the course fee somehow cover the journey as well… ;-)
Greetings from Munich!
Rye
October 20, 2015I am jealous you are from a city where the public employees run Linux ;)