Switch from Photoshop to GIMP: Tips From A Pro

Over six months ago, I stopped using Adobe Photoshop and switched to GIMP for all my personal photography projects. This wasn’t the impossible task that most people believe it is.
Users often claim that Photoshop is absolutely essential to their workflow. Across the internet, forum users are ridiculed for even suggesting that someone try to replace Photoshop with GIMP.
But times have changed. Photoshop isn’t the killer app that it used to be. I spend about 90% of my time in Lightroom and only 10% in Photoshop. This is the same for many other professionals. We’ve all switched to the RAW format, so we use RAW photo editors most of the time. Photoshop is often just used for final touch ups.
Photoshop isn’t the killer app that it used to be. I spend about 90% of my time in Lightroom and only 10% in Photoshop.
For the reduced role that Photoshop now plays in many photographers’ workflows, GIMP is surprisingly capable. However, transitioning to GIMP can be frustrating because the keyboard shortcuts, tools and interface are different from Photoshop’s. The following setup tips can help make Photoshop users feel much more at home in GIMP.
Easily Setup Photoshop Keyboard Shortcuts in GIMP

By simply replacing one configuration file, you can have Photoshop’s keyboard shortcuts enabled in GIMP. This is by far, the most helpful thing I did to make my transition to GIMP easier. In fact, I am almost useless in GIMP without it.
Since GIMP and Photoshop are not exactly the same, there are a few differences. You can view a list of all the keyboard shortcuts here (requires Java).
In Linux
- Download the ps-menurc file from freeshell.org
- In the folder ~/.gimp-2.8, rename the file “menurc” to “menurc-backup”
- Rename the ps-menurc file you downloaded to “menurc” and move it to ~/.gimp-2.8
- Relaunch GIMP for the changes to take effect
In Mac OS X
You can’t view hidden files by default in newer versions of Mac OS X. So you first need to make the ~/Library folder visible.
- In terminal run:
chflags nohidden ~/Libraryto make the Library folder visible - Hold down ALT and right-click on the Finder icon in the dock, choose relaunch
- Go to ~/Library/Application Support/GIMP/2.8/ and rename the file “menurc” to “menurc-backup”
- Rename the ps-menurc file you downloaded to “menurc” and move it to ~/Library/Application Support/GIMP/2.8/
- Relaunch GIMP for the changes to take effect
*After installing the configuration file, I also recommend binding “[” to Decrease Brush Size More, and “]” to Increase Brush Size More to speed up brush size changes.
Install a ‘Layer From Current Selection’ Replacement

In Photoshop, CTRL+J can be used for more than just duplicating the current layer, it can make a new layer from the current selection. This is a really handy tool that I use very often in Photoshop. You can add the same function to GIMP’s Layer menu with a plugin called Layer via Copy/Cut.
- Install the plugin Layer via Copy/Cut plugin: http://registry.gimp.org/node/26396
- With your current layer active, make a selection
- In the main menu choose: Layer => Layer via Copy
- Your selection will be copied to a new layer
*Combining the ‘Layer via Copy’ feature with layer masks is a great way to create composite images in GIMP. The two can also be a capable (but less efficient) replacement to the patch tool in Photoshop.
Make ‘Snap to Canvas Edge’ the Default

Something I find really frustrating in GIMP, is that by default, layers don’t snap the edge of the canvas (or the grid) when I move them. It gets worse because you have to enable it every single time you open an image. Fortunately, since open source software is so customizable, this can easily be changed.
- Open ~/.gimp-2.8/gimprc with a text editor
- At the bottom, add the two lines:
(default-snap-to-canvas yes)
(default-snap-to-grid yes)
- Save and close
Disable ‘Show Layer Boundary’ by Default

Someting I never got used to in GIMP is the yellow and black dotted line that surrounds the active layer. Though it can be helpful at times, I definitely prefer to have it disabled by default.
- From the main menu go to Edit => Preferences => Image Windows => Appearance
- Uncheck Show Layer Boundary under both Normal Mode and Fullscreen Mode
- Restart GIMP to for the changes to take effect
You can always temporarily turn it back on by clicking on View in the main menu and choosing Show Layer Boundary.
Make the Move Tool Function Like Photoshop’s
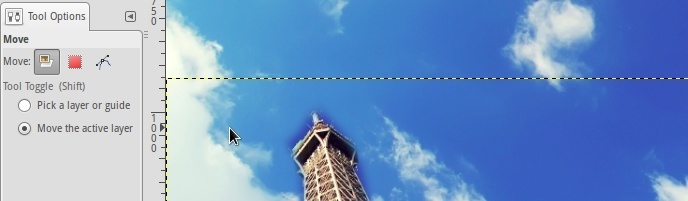
By default, the Move Tool in GIMP is set to Pick a Layer or Guide. With this option set, it is a bit more like Inkscape or Illustrator because you also move things that are not on the current layer (like the background). If you are a long time Photoshop user, this is very strange.
To make it function like Photoshop, you want to set the default to Move the Active Layer.
- Select the Move Tool for the Tool Box in the left panel
- In the Tool Options dialogue box check Move the Active Layer
- From the main menu go Edit => Preferences => Tool Options => Save Tool Options Now
- Restart GIMP
Install a ‘Content Aware Fill’ Replacement

The useful “Content Aware Fill” feature that showed up in Photoshop CS5 (or was it CS4?) actually originated as a GIMP plugin called “Resynthesizer”. It allows you to make a selection around something you don’t want in an image, push a key, and puff! it’s gone.
The Heal Selection plugin (aka smart remove) is a great replacement for Content Aware Fill. The easiest way to install it, and many other helpful plugins, in Linux is to install the full GIMP Plugin Registry. This can be done via Thorsten Stettin‘s PPA. In Terminal run:
sudo add-apt-repository ppa:otto-kesselgulasch/gimp
sudo apt-get update
sudo apt-get install gimp-plugin-registry
If you don’t want to install the full plugin registry, you can just install the two required plugins:
Resynthesizer: http://registry.gimp.org/node/27986
Heal Selection: http://registry.gimp.org/node/15118
Once installed, make a selection, then go to Filters => Enhance => Heal Selection.
Install ICC Color Profiles

If you are running Ubuntu, or any of its derivatives like Linux Mint or elementary OS, you can download high quality, freely availible ICC color profiles (like sRGB) directly from the repositories. Just search for “icc color profiles” in your package manager. They will be copied to /usr/share/color/icc/
If you are not running one of the *buntus, you can get sRGB ICC profiles directly from the International Color Consortium.
For the photographers shooting in the Abode RGB color space (which has a wider color gamut than sRGB), you can download the color profiles from Adobe’s website. This package also includes CMYK color profiles. You will be required to agree to Adobe’s EULA. I recommend copying the files to /usr/share/color/icc/.
Once you have the color profiles on your disk, you need to let GIMP know where they are. From the main menu in GIMP, go to Edit => Preferences => Color Management. Make sure Mode of Operation is set to Color Managed Display, and select your RGB and CMYK ICC files in the drop down menus below.
Of course, your monitor has already been color calibrated right?… Nobody would be silly enough to try and color balance a photo without first calibrating their monitor…. right?
Install the CMYK Conversion Plugin

…or even better, just use the free, open-source digital painting program Krtia to convert your images from RGB to CMYK. Open the photo in Krita and from the main menu go to:
- Image => Convert Image Type
- Choose CMYK, 8bit (or 16bit!) depth and your color profile
- Then, File => Export and choose TIFF
But… if you want to do it all in GIMP, you can convert an image from the RGB color space to CMYK with the Separate+ plugin. However, there are a couple of limitations. The Arch Linux wiki has a great write-up about the limitations (as well as how to soft-proof an image). Some of the things Separate+ can do:
- Separate a RGB image
- Attach ICC profiles to separated image files
- Convert from one RGB profile to another
- Soft-proof colors
If you installed the “gimp-plugin-registry” package from the PPA I mentioned previously, you already have it. If you didn’t, you can also install it from the GIMP Plugin Registry website.
To convert your image to CMYK in GIMP:
- From the main menu, go to Image => Separate => Separate
- This will give you a new image that looks inverted and has four separate layers
- Go to Image => Separate => Export to export your image to a .tiff file
*In my work as a professional photographer, it is actually the graphic designers and printers that I send my photos to who require CMYK support. Whether it’s for a magazine, a newspaper or even a billboard ad, I’ve never had someone request a photo in the CMYK color space. In fact, they always request that the photos are in the RGB color space, then they do the conversion themselves.
Customize Your Workspace
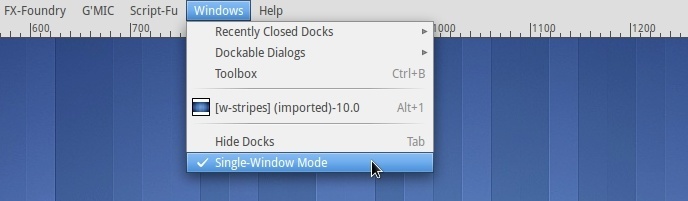
Enable Single-Window Mode
This seems like an obvious step, but I’ve met several GIMP users who didn’t even know it was an option. Photoshop users will feel much more at home when they have their tools, menus, panels and workspace together in one window.
From the main menu, simply go to Windows => Single-Window Mode
Dockable Dialogues
To free up a lot of space on the left side panel, move the Tool Options dock to the bottom right panel. Then resize your left panel to something much thinner.
If you want GIMP to really mimic Photoshop, you can move the Layers dialogue to the bottom right panel. Personally, I’ve grown to like my Layers at the top and the Tool Options at the bottom.


")


20 Comments
nemesioansorin
June 15, 2014to complete this good tutorial now follow this link : http://www.webupd8.org/2014/02/gimp-get-photoshop-like-keyboard.html to get Photoshop Icons in toolbar and Photoshop keyboard shortcuts for GIMP ..
Image Masking
May 11, 2014I get your point of switching from photoshop to gimp, but still I feel photoshop is much user friendly thank Gimp. I am very comfortable of using photoshop for all of my editing tasks and designing the creative banner.
Baczo
April 2, 2014i’ll be very pleased if i can make these work on portable version too :)
rileybphoto
March 28, 2014But which settings file? There are alot, like: menu, plugins, theme, profiles, tools, etc. There isn’t a single config file for GIMP.
lazaruslarue
March 30, 2014one option… send them to me in a zipfile at my disqus username + gmail. go make a github account. i’ll post them up and transfer ownership to you.
erlend_sh
March 28, 2014Great tricks here! I think you just convinced me to stop my monthly subscription and go back to GIMP.
Btw, how about re-skinning GIMP to look more like Photoshop while you’re at it?
http://gnome-look.org/content/show.php/Gimp+GTK2+Photoshop+CS6+Theme?content=160952
http://thegimp.ca/gimp-2-8-dark-theme-stonewashed-2/
rileybphoto
March 28, 2014The dark theme looks good, but I actually prefer the older 50% grey background. However, those toolbar icons -awesome!
valugi
March 28, 2014can somebody make all these features into a “photoshop mode” plugin for Gimp?
rileybphoto
March 28, 2014That would be very cool. It is beyond my skill set though. A bash script or some kind of config file would be great.
meanyack
March 28, 2014I use Paint over Gimp and Photoshop…
PS: I’m kidding. I used Gimp a lot and liked it. However, if you are web designer you may see Photoshop is still has the largest piece from the cake. However, PS losing its popularity because of Sketch and Gimp.
rileybphoto
March 28, 2014MS Paint FTW!
Darron
March 27, 2014There is an easier way to get to ~/Library on OSX. If you’re running Mavericks got to Finder and hold the Alt key when clicking on Go in the menu bar.
rileybphoto
March 27, 2014Thanks for the tip. I’ll try it out when I upgrade to Mavericks.
Guest Info
March 27, 2014Thank you for these infos, would be nice to read more about your working with Gimp and how to overcome limitations. BTW, maybe many readers did not notice that LIGHTZONE is back! Now as a free and open source software! This is a really strong contender to LR, go and take a look: http://www.lightzoneproject.org/
rileybphoto
March 27, 2014Thanks!
I know about Lightzone, but am currently occupied learning darktable :)
Thing2
March 27, 2014Can you share your settings file as a github .gist or something?
rileybphoto
March 27, 2014If I had any idea how to use github, I would. It would be cool to have my own custom version of GIMP out there ;)
orliesaurus
March 28, 2014Just go to https://gist.github.com/ and paste the settings file in there
Adam Keck
March 27, 2014Probably the most remarkable advancement of Gimp I’ve seen in recent years is the deployment of its non-X-Windows “native” OSX GUI in recent 2.8.x releases. I know they had been working on it for a long time. It’s made the iPhoto/Gimp work flows on OSX much smoother.
Regarding Gimp-Inkscape-Scribus vs. Adobe Cloud CS, they are both very useful in their own ways. Adobe has worked hard to make efficient all-digital work flows over the past decade. Since Adobe have revenue from licensing, they can make a much more complete effort to research and implement digital work flows. That being said, I find it fascinating to watch how the OSS teams are tackling the same issues with their much more limited resources. For a volunteer effort, Gimp-Inkscape-Scribus stack has become very capable in recent years. If you are only producing for digital consumption, it can be completely sufficient for many work flows. I still recommend Cloud CS, though, if someone is targeting physical media.
rileybphoto
March 27, 2014Since I mostly use the Linux version, it is easy for me to overlook what an accomplishment dropping the X-11 requirement for the Mac version was. Props to the devs.
I’ve also been very impressed with the open-source tools recently. They are far more capable than I ever expected. The next version of GIMP combined with darktable will be a pretty compelling combination for open-source photographers.